The following conventions are used in this user guide:
| SLA | Singapore Land Authority |
| Bold Italics Text | Data Items options |
| Bold Text | Dialog box, titles |
| [B] | Command button |
| [C] | Check Box |
| [D] | Drop Down Combo Box |
| [H] | Hyperlink: a reference (link) to the location of the related resource electronically |
| [M] | Menu item |
| [R] | Radio Button |
| [S] | Scrolling Text Box |
| [T] | Single Line Text Box |
| Click | Press the left button of the mouse |
Vertical and Horizontal Scroll Bars

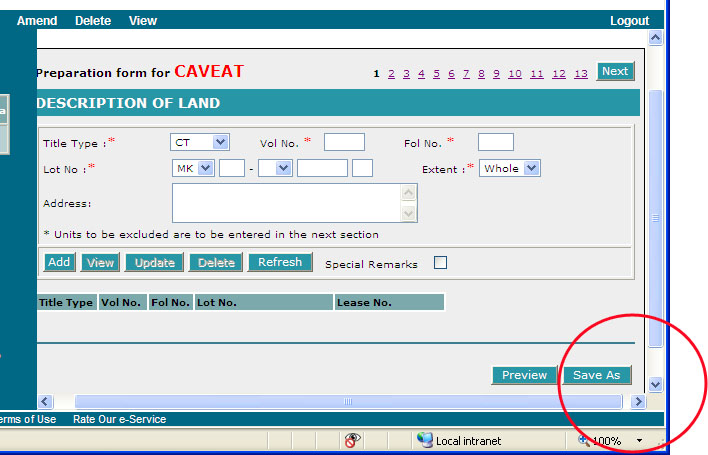
Scroll bars will appear if the display is larger than the screen area. Scrolling up and down and sideways is made possible by dragging the appropriate scroll bars on the right or bottom side of the browser window (marked in a red circle).
Command Button
![]()
When you click on a command button, the system will perform a certain function. The above panel shows the Add, View, Update, Delete, and Refresh buttons. These buttons are commonly found in sections where multiple entries are allowed.
| Command Button | Function |
| Add | Click on Add [B] to add a record into the system. |
| View | Click on View [B] to view the record you have selected. |
| Update |
Click on Update [B] to amend the record that you have selected for viewing. |
| Delete | Click on Delete [B] to delete the record you have selected. |
| Refresh | Click on Refresh [B] to clear the data entries on the screen. |
Other buttons available are displayed below:
| Command Button | Function |
| Amend | Click on Amend [B] to invoke a form for amendment. |
| Cancel | Click on Cancel [B] to cancel the function and return to the previous screen. |
| Clear |
Click on Clear [B] to clear the data entries that are on the screen. This is commonly found in the Amend, Copy, Delete and View/Print functions. |
| Copy | Click on Copy [B] to invoke the copy function for the form. |
| Preview | Click on Preview [B] to view the document in printable format. |
| Click on Print [B] to send the document to the printer. | |
| Reset Page | Click on Reset Page[B] to clear the data entries on the screen. This is commonly found in sections where there is only single entry. |
| Save As / Save | Click on Save As [B] or Save [B] to save the form. |
| Save & Validate | Click on Save & Validate [B] to save and validate the form |
Data Entry Fields
There are five types of data entry fields:
| 1. Check Box [C] | A Check Box appears as |
|
| 2. Drop-Down Combo Box [D] | This allows you to select an entry or item from a drop-down list which will be displayed upon clicking on the combo box down arrow. However, you will not be able to amend the field values in the list. | |
| 3. Radio Buttons [R] | A Radio Button appears as |
|
| 4. Scrolling Text Box [S] | This allows you to enter data into a text area whereby you are able to scroll the area using the arrows at the right hand side of the text box. | |
| 5. Single Line Text Box [T] | This allows you to enter data in a single line. |
The calendar icon ![]() can be found next to a single line text box for date entries. When you click
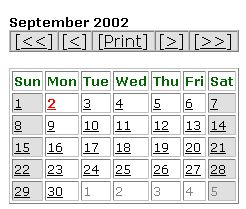
on this icon, the following window will appear for you to select the date.
can be found next to a single line text box for date entries. When you click
on this icon, the following window will appear for you to select the date.

The current date is highlighted in red.
You may click on [<<] to go to the previous year, [>>] to go to the next year, [<] to go to the previous month and [>] to go to the next month.
Click on a number to select a date. The date will be inserted into the single line text box next to the calendar icon.
Note:
You are encouraged to use this feature for all date fields to minimise possible typing errors.
Special Remarks![]()
The Special Remarks is provided in some sections of the form to cater for unique circumstances which cannot fit into the respective sections. It can contain up to a maximum of 2000 characters including spaces.
| 1. |
|
| 2. | Click on the check box to remove the Special Remarks [S]. However, if there are data in the Special Remarks [S], the system will ask you to confirm the removal of the contents in the Special Remarks [S]. |

Above shows a sample print out of the data if all 2000 characters are filled.
