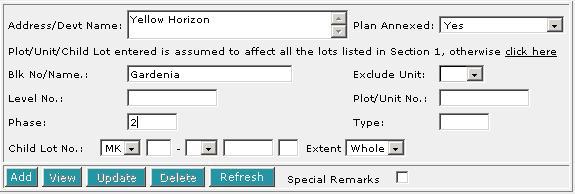
This section allows you to enter the description of land. The compulsory data
items are indicated by an * marked in red.
To create a record:
| 1. |

Select the Title Type [D].
|
| 2. |

If CT (Certificate of Title), SCT (Subsidiary
Certificate of Title) or SSCT (Subsidiary Strata Certificate
of Title) is selected, enter Vol No [T] and Fol No [T].

If Lease is selected, enter the Lease No. [T].
|
| 3. |
Select the MK (Mukim) or TS (Town
Subdivision) and enter the rest of the Lot No. [D, T]. |
| 4. |
Enter Address [S]. |
| 5. |
Click on Add [B]. Repeat the previous steps to add
more records. |
To view a record:
| 1. |

Select the check box of the record to be viewed.
|
| 2. |
Click on View [B]. The record will be displayed in
the data entry screen for viewing. |
To update a record:
| 1. |

Select the check box of the record to be updated.
|
| 2. |
Click on View [B]. |
| 3. |
Make the necessary changes to the displayed record. |
| 4. |
Select the check box of the record again. |
| 5. |
Click on Update [B]. |
To delete a record:
| 1. |

Select the check box(es) of the record(s) to be deleted.
|
| 2. |
Click on Delete [B]. |
To refresh the screen:
| 1. |
Click on Refresh [B] to clear the data entries on the
screen.
|
Special Remarks
If you selected Part in the Extent field, then PLOT/UNIT
AND CHILD LOT DETAILS section must be filled in.
Back to Forms
| PLOT/UNIT
AND CHILD LOT DETAILS |
This section is compulsory if the Extent field is selected as Part
in the DESCRIPTION OF LAND section.
To create a record:
| 1. |

Enter the data as required. If you enter both the particulars of the Unit
as well as the Child lot number within the same screen, it is assumed
that both refer to the same property.

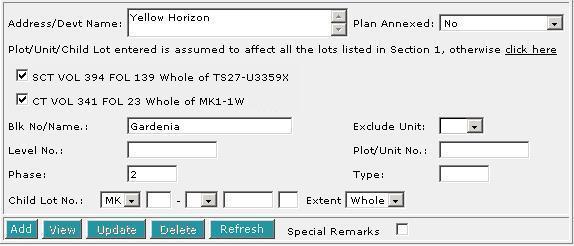
The Plot/Unit/Child Lot entered is assumed to affect all the lots listed
in DESCRIPTION OF LAND section. If this is not the
case and you wish you specify a particular lot, then click on "click
here" [H]. The screen will display all the lots from the
DESCRIPTION OF LAND section. Select the lot that is
relevant to your Plot/Unit/Child Lot.
|
| 2. |
Click on Add [B]. Repeat the previous steps to add
more records. |
To view a record:
| 1. |

Select the check box of the record to be viewed.
|
| 2. |
Click on View [B]. The record will be displayed in
the data entry screen for viewing. |
To update a record:
| 1. |

Select the check box of the record to be updated.
|
| 2. |
Click on View [B]. |
| 3. |
Make the necessary changes to the displayed record. |
| 4. |
Select the check box of the record again. |
| 5. |
Click on Update [B]. |
To delete a record:
| 1. |

Select the check box(es) of the record(s) to be deleted. |
| 2. |
Click on Delete [B]. |
To refresh the screen:
| 1. |
Click on Refresh [B] to clear the data entries on the screen.
|
Special Remarks
Back to Forms
| DECLARANT / APPLICANT (for and on behalf of the President of the Republic of
Singapore)
|
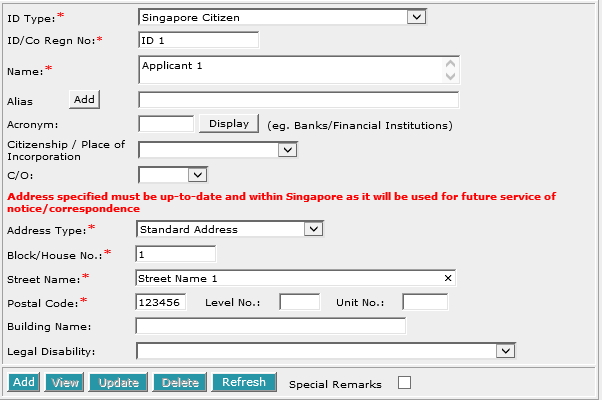
This section allows you to enter the details of the above parties. The compulsory
data items are indicated by an * marked in red.
To create a record:
| 1. |

Enter the data. For example, ID/Co Regn No. [T], Name
[S], Block/House No.[T], Street Name [T]
and Postal Code [T].
|
| 2. |
To enter alias(es):

You may enter the aliases in the text box provided. To add more Aliases,
click on Add [B] and enter the name in the text box provided. Repeat
the previous steps to add more records. You may enter up to 5 aliases.
Empty alias fields will automatically be deleted when the screen is refreshed.
|
| 3. |
Click on Add [B]. Repeat the previous steps
to add more records. |
To view a record:
| 1. |

Select the check box of the record to be viewed.
|
| 2. |
Click on View [B]. The record will be displayed in
the data entry screen for viewing. |
To update a record:
| 1. |

Select the check box of the record to be updated.
|
| 2. |
Click on View [B]. |
| 3. |
Make the necesssary changes to the displayed record. |
| 4. |
Select the check box of the record again. |
| 5. |
Click on Update [B]. |
To delete a record:
| 1. |

Select the check box(es) of the record(s) to be deleted.
|
| 2. |
Click on Delete [B]. |
To refresh the screen:
| 1. |
Click on Refresh [B] to clear the data entries on the screen.
|
Special Remarks
Note:
Information entered in this section will be used for the generation of EXECUTION
BY APPLICANT where applicable.
Back to Forms
This section allows you to enter the reasons for the application pursuant to
the relevant legislation where applicable.

| 1. |
Enter the reasons for the application in the text box provided. Data entered will be printed on the Form accordingly. |
| 2. |
Select the appropriate Legislation [D]. However, this selection made will not be printed on the form. |
When Legislation [D] is Others, a free text box will be
provided.

Special Remarks
Back to Forms
This section allows you to enter the supporting evidence.

Back to Forms

Enter the Date of Application [T].
This is a compulsory data item as indicated by an *
marked in red. However, if you are not in a position
to enter the date at the time of preparation of the form, you may enter the
date prior to submission for lodgment. You will be given a reminder message "Please ensure Date is entered before submission.
Click [OK] to proceed or [Cancel] to enter now".
Back to Forms
This section is dependent on the information entered in the DECLARANT
/ APPLICANT
section.
If there is only one applicant entered in previous section, you will be prompted:

| 1. |
Select the appropriate mode of execution.
|
| 2. |
Please proceed to fill data according to the radio button
selected. Apart from the mode Others [R], the
Execution Clause will be generated automatically. Please see Modes
of Execution for details. |
If there are more than one applicant entered in previous section, you will
be prompted:
Select Yes or No.
If you have selected Yes:

| 1. |
Select the appropriate mode of execution. |
| 2. |
Please proceed to fill data according to the radio button
selected. Apart from the mode Others [R], the
Execution Clause will be generated automatically. Please see Modes
of Execution for details. |
If you have selected No:

For each applicant:
| 1. |
Select the appropriate mode of execution.
|
| 2. |
Please proceed to fill data according to the radio button
selected. Apart from the mode Others [R], the
Execution Clause will be generated automatically. Please see Modes
of Execution for details. |
Special Remarks
Back to Forms
This optional section allows you to enter your case file reference or the CPF
case file reference.

| 1. |
Enter the Law firm case file reference [T] if necessary. |
| 2. |
Enter the CPF case file reference [T] if necessary. |
Back to Forms


