This section allows you to enter the description of land.
The compulsory data items are indicated by an *
marked in red.
To create a record:
| 1. |

Select the Title Type [D].
|
| 2. |

If CT (Certificate of Title), SCT (Subsidiary
Certificate of Title) or SSCT (Subsidiary Strata Certificate
of Title) is selected, enter the Vol No [T] and Fol No
[T].

If Lease is selected, enter the Lease No. [T].
|
| 3. |
Select the MK (Mukim) or TS (Town
Subdivision) and enter the rest of the Lot No. [D, T]. |
| 4. |
Enter the Address [S]. |
| 5. |
Click on Add [B]. Repeat the previous steps to add
more records. |
To view a record:
| 1. |

Select the check box of the record to be viewed.
|
| 2. |
Click on View [B]. The record will be displayed in
the data entry screen for viewing. |
To update a record:
| 1. |

Select the check box of the record to be updated.
|
| 2. |
Click on View [B]. |
| 3. |
Make the necessary changes to the displayed record. |
| 4. |
Select the check box of the record again. |
| 5. |
Click on Update [B]. |
To delete a record:
| 1. |

Select the check box(es) of the record(s) to be deleted.
|
| 2. |
Click on Delete [B]. |
To refresh the screen:
| 1. |
Click on Refresh [B] to clear the data entries on the
screen.
|
Special Remarks
If you selected Part in the Extent field, then PLOT/UNIT
AND CHILD LOT DETAILS section must be filled in.
Back to Forms
| PLOT/UNIT
AND CHILD LOT DETAILS |
This section is compulsory if the Extent field is selected as Part
in the DESCRIPTION OF LAND section.
To create a record:
| 1. |

Enter the data as required. If you enter both the particulars of the Unit
as well as the Child lot number within the same screen, it is assumed
that both refer to the same property.

The Plot/Unit/Child Lot entered is assumed to affect all the lots listed
in DESCRIPTION OF LAND section. If
this is not the case and you wish to specify a particular lot, then click
on "click here" [H]. The screen will display all
the lots from the DESCRIPTION OF LAND
section. Select the lot that is relevant to your Plot/Unit/Child Lot.
|
| 2. |
Click on Add [B]. Repeat the previous steps to add
more records. |
To view a record:
| 1. |

Select the check box of the record to be viewed.
|
| 2. |
Click on View [B]. The record will be displayed in
the data entry screen for viewing. |
To update a record:
| 1. |

Select the check box of the record to be updated.
|
| 2. |
Click on View [B]. |
| 3. |
Make the necessary changes to the displayed record. |
| 4. |
Select the check box of the record again. |
| 5. |
Click on Update [B]. |
To delete a record:
| 1. |

Select the check box(es) of the record(s) to be deleted. |
| 2. |
Click on Delete [B]. |
To refresh the screen:
| 1. |
Click on Refresh [B] to clear the data entries on the screen.
|
Special Remarks
Back to Forms
| REGISTERED
MORTGAGE / CHARGE NO. |
This section allows you to enter the registered mortgage / charge number.
To create a record:
| 1. |

Select Instrument No [R] or Deed No [R] and enter the data
accordingly. |
| 2. |
Click on Add [B]. Repeat the previous steps
to add more records. |
To delete a record:
| 1. |
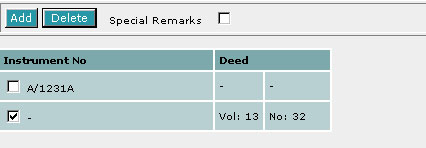
Select the check box(es) of the record(s) to be deleted. |
| 2. |
Click on Delete [B]. |
Special Remarks
Back to Forms
This section allows you to enter the details of the above parties. The compulsory
data items are indicated by the * marked in red.
To create a record:
| 1. |
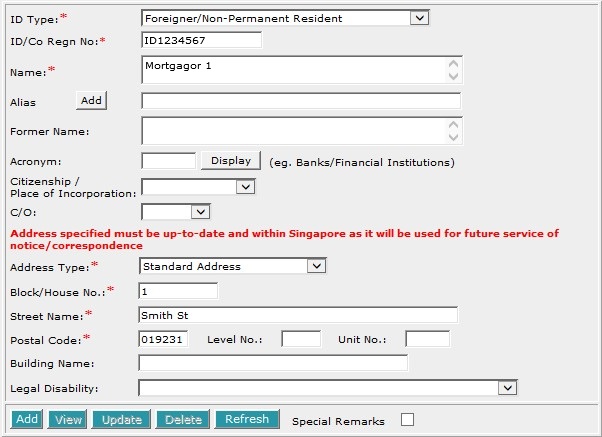
Enter the data. For example, ID/Co Regn No. [T], Name [S],
Block/House No.[T], Street Name [T] and Postal Code [T].
|
| 2. |
To enter alias(es):

You may enter the aliases in the text box provided. To add more Aliases,
click on Add [B] and enter the name in the text box provided. Repeat
the previous steps to add more records. You may enter up to 5 aliases.
Empty alias fields will automatically be deleted when the screen is refreshed.
|
| 3. |
To indicate legal disability:
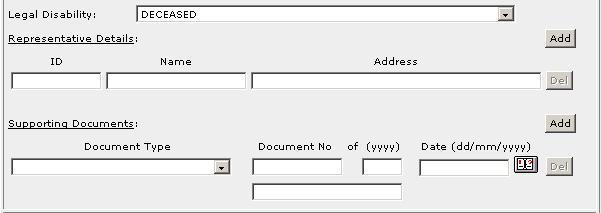
If you wish to indicate that a party is under a Legal Disability [D],
you may select from the list provided. You may then enter the details
of the representative and supporting documents in the text boxes provided.
To add more representatives or supporting documents click on Add [B]
next to the respective headers. You may add up to 5 records each. Click
on Del [B] to remove any redundant rows.
|
| 4. |
Click on Add [B]. Repeat the previous steps
to add more records. |
To view a record:
| 1. |

Select the check box of the record to be viewed.
|
| 2. |
Click on View [B]. The record will be displayed in
the data entry screen for viewing. |
To update a record:
| 1. |

Select the check box of the record to be updated.
|
| 2. |
Click on View [B]. |
| 3. |
Make the necessary changes to the displayed record. |
| 4. |
Select the check box of the record again. |
| 5. |
Click on Update [B]. |
To delete a record:
| 1. |

Select the check box(es) of the record(s) to be deleted.
|
| 2. |
Click on Delete [B]. |
To refresh the screen:
| 1. |
Click on Refresh [B] to clear the data entries on the
screen.
|
Special Remarks
Note:
Information entered in this section will be used for the generation of the EXECUTION
BY MORTGAGOR / CHARGOR and CERTIFICATE
OF CORRECTNESS.
Back to Forms
This section allows you to enter the details of the above parties. The compulsory
data items are indicated by the * marked in red.
To create a record:
| 1. |
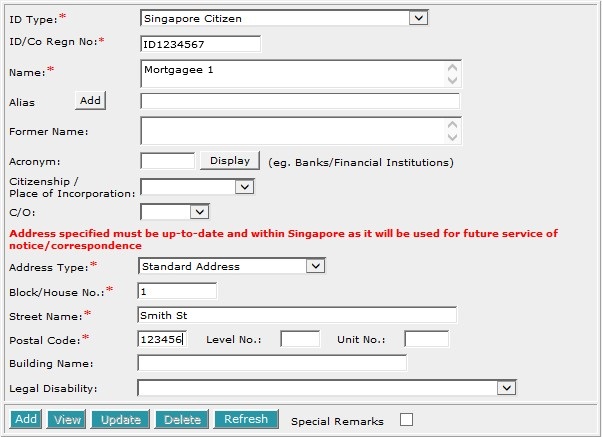
Enter the data. For example, ID/Co Regn No. [T], Name [S],
Block/House No.[T], Street Name [T] and Postal Code [T].
|
| 2. |
To enter alias(es):

You may enter the aliases in the text box provided. To add more Aliases,
click on Add [B] and enter the name in the text box provided. Repeat
the previous steps to add more records. You may enter up to 5 aliases.
Empty alias fields will automatically be deleted when the screen is refreshed.
|
| 3. |
To indicate legal disability:
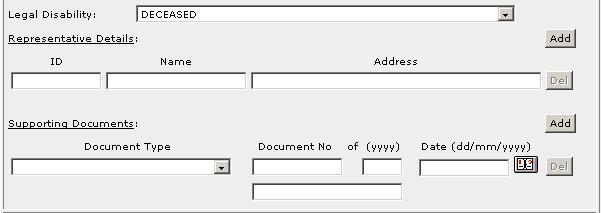
If you wish to indicate that a party is under a Legal Disability [D],
you may select from the list provided. You may then enter the details
of the representative and supporting documents in the text boxes provided.
To add more representatives or supporting documents click on Add [B]
next to the respective headers. You may add up to 5 records each. Click
on Del [B] to remove any redundant rows.
|
| 4. |
Click on Add [B]. Repeat the previous steps
to add more records. |
To view a record:
| 1. |

Select the check box of the record to be viewed.
|
| 2. |
Click on View [B]. The record will be displayed in
the data entry screen for viewing. |
To update a record:
| 1. |

Select the check box of the record to be updated.
|
| 2. |
Click on View [B]. |
| 3. |
Make the necessary changes to the displayed record. |
| 4. |
Select the check box of the record again. |
| 5. |
Click on Update [B]. |
To delete a record:
| 1. |

Select the check box(es) of the record(s) to be deleted.
|
| 2. |
Click on Delete [B]. |
To refresh the screen:
| 1. |
Click on Refresh [B] to clear the data entries on the
screen.
|
Special Remarks
Note:
Information entered in this section will be used for the generation of the EXECUTION
BY MORTGAGEE / CHARGEE and CERTIFICATE
OF CORRECTNESS.
Back to Forms
| TERMS, COVENANTS AND CONDITIONS |
This section allows you to enter the terms, covenants and conditions.
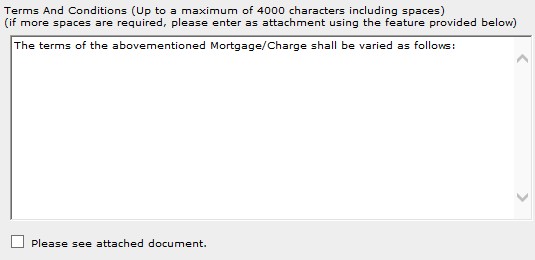
You may enter the Terms and Conditions [S] up to a maximum of 4000 characters
including spaces (estimated to be about 500 words) in the text area provided.
If the Terms and Conditions [S] requires more than 4000 characters (ie.
slightly more than half-page), you will need to write it in a separate document.
If you have a document to attach to the form, select the check box for "Please see attached document".
Back to Forms

Enter the Date of Instrument [T].
This is a compulsory data item as indicated by an *
marked in red. However, if you are not in a position
to enter the date at the time of preparation of the form, you may enter the
date prior to submission for lodgment. You will be given a reminder message "Please ensure Date is entered before submission.
Click [OK] to proceed or [Cancel] to enter now".
Back to Forms
| EXECUTION BY
MORTGAGOR / CHARGOR |
This section is dependent on the information entered in the MORTGAGOR
/ CHARGOR
section.
If there is only one mortgagor/chargor entered in previous section, you will be prompted:

| 1. |
Select the appropriate mode of execution.
|
| 2. |
Please proceed to fill data according to the radio button
selected. Apart from the mode Others [R], the
Execution Clause will be generated automatically. Please see Modes
of Execution for details. |
If there are more than one mortgagor/chargor entered in previous section, you will be
prompted:

Select Yes or No.
If you have selected Yes:

| 1. |
Select the appropriate mode of execution. |
| 2. |
Please proceed to fill data according to the radio button
selected. Apart from the mode Others [R], the
Execution Clause will be generated automatically. Please see Modes
of Execution for details. |
If you have selected No:

For each mortgagor/chargor:
| 1. |
Select the appropriate mode of execution.
|
| 2. |
Please proceed to fill data according to the radio button
selected. Apart from the mode Others [R], the
Execution Clause will be generated automatically. Please see Modes
of Execution for details. |
Special Remarks
Back to Forms
| EXECUTION BY
MORTGAGEE / CHARGEE
|
This section is dependent on the information entered in the MORTGAGEE
/ CHARGEE
section.
If there is only one mortgagee/chargee entered in previous section, you will be prompted:

| 1. |
Select the appropriate mode of execution.
|
| 2. |
Please proceed to fill data according to the radio button
selected. Apart from the mode Others [R], the
Execution Clause will be generated automatically. Please see Modes
of Execution for details. |
If there are more than one mortgagee/chargee entered in previous section, you will be
prompted:

Select Yes or No.
If you have selected Yes:

| 1. |
Select the appropriate mode of execution. |
| 2. |
Please proceed to fill data according to the radio button
selected. Apart from the mode Others [R], the
Execution Clause will be generated automatically. Please see Modes
of Execution for details. |
If you have selected No:

For each mortgagee/chargee:
| 1. |
Select the appropriate mode of execution.
|
| 2. |
Please proceed to fill data according to the radio button
selected. Apart from the mode Others [R], the
Execution Clause will be generated automatically. Please see Modes
of Execution for details. |
Special Remarks
Back to Forms
| CERTIFICATE
PURSUANT TO PART IV/IVB OF THE HOUSING AND DEVELOPMENT ACT |
This section allows you to enter the Certificate pursuant to Part IV/IVB of the Housing and Development Act. If the property is sold under Part IV/IVB (residential flat), then this
certificate must be prepared. The compulsory data items are indicated by an *
marked in red.

| 1. |
Enter Name [T], Designation [T] and select Provisions [D]. Certificate will not be printed if no data has been entered. |
Special Remarks
Back to Forms
| CERTIFICATE
OF CORRECTNESS |
This section is dependent on the information entered in the MORTGAGOR
/ CHARGOR
and MORTGAGEE / CHARGEE sections.
If there is only one party entered in previous sections, you will be prompted:

| 1. |
Select the appropriate mode of execution.
|
| 2. |
Please proceed to fill data according to the radio button
selected. Apart from the mode Others [R], the Certificate of Correctness will be generated automatically. Please
see Modes of
Execution for Certificate of Correctness for details. |
If there are more than one party entered in previous section, you will be prompted:
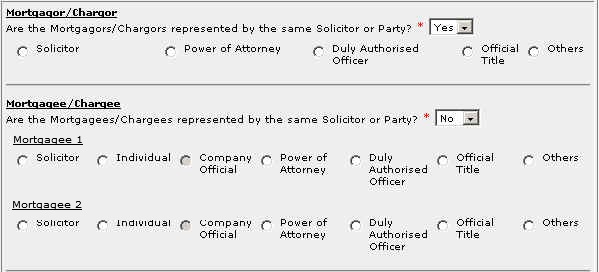
Select Yes or No. The example above shows the mode
of execution that are available if Yes is selected and if No
is selected.
For each party:
| 1. |
Select the appropriate mode of execution.
|
| 2. |
Please proceed to fill data according to the radio button
selected. Apart from the mode Others [R], the Certificate of Correctness will be generated automatically. Please
see Modes of
Execution for Certificate of Correctness for details. |
Special Remarks
Back to Forms
This section allows you to enter the consent of parties with prior interest. The compulsory
data items are indicated by the * marked in red.
To create a record:
| 1. |
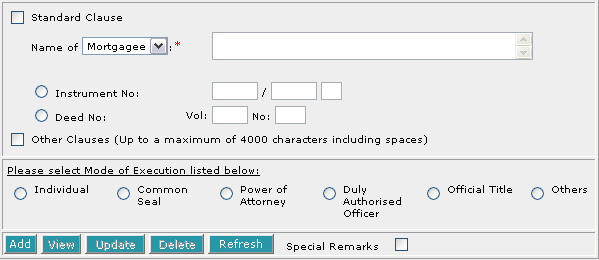
Select the checkbox beside Standard Clause and/or Other
Clauses.
|
| 2. |
If Standard Clause is selected,
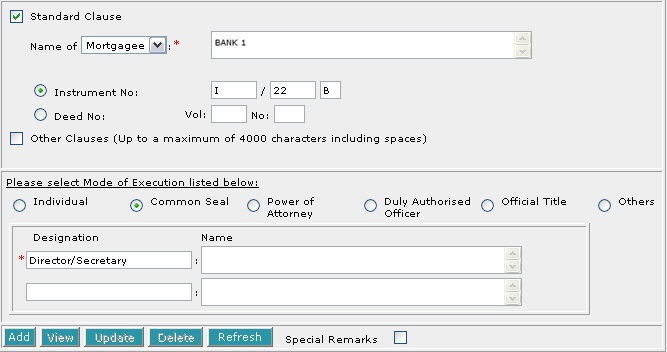
Select Mortgagee, Chargee or Lessor from the drop down next to Name
of [D] and enter the Name [S]. The default is set to
Mortgagee Consent. Select either Instrument No [R] or Deed No [R]
and enter the respective Instrument No [T] or Vol [T] and No
[T]. However, if you are not in a position to enter the name and instrument/deed no at the time of preparation of the form,
you may enter the name and instrument/deed no prior to submission for lodgment. You will be given a reminder message "Please ensure Name and Instrument/Deed No are entered before submission.
Click [OK] to proceed or [Cancel] to enter now".
|
| 3. |
If Other Clauses is selected, 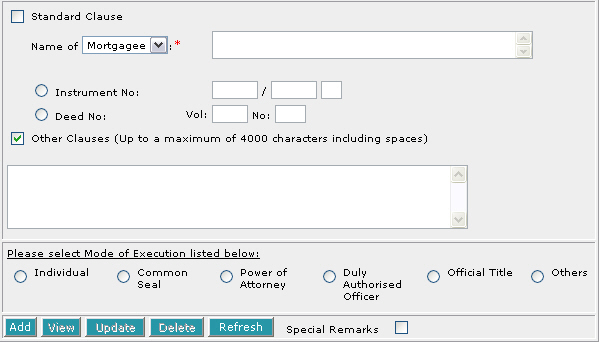
Enter
the Other Clauses [S].
|
| 4. |
Select the appropriate mode of execution. |
| 5. |
Proceed to fill data accordingly to the radio button
selected. Apart from the mode Others [R], the consent will be
generated automatically. If you have selected Others [R], you will
be required to type the consent in full. Please see Modes
of Execution for Consent for details. |
| 6. |
Click on Add [B]. Repeat the previous steps
to add more records. |
To view a record:
| 1. |

Select the check box of the record to be viewed.
|
| 2. |
Click on View [B]. The record will be displayed in
the data entry screen for viewing. |
To update a record:
| 1. |

Select the check box of the record to be updated.
|
| 2. |
Click on View [B]. |
| 3. |
Make the necessary changes to the displayed record. |
| 4. |
Select the check box of the record again. |
| 5. |
Click on Update [B]. |
To delete a record:
| 1. |

Select the check box(es) of the record(s) to be deleted.
|
| 2. |
Click on Delete [B]. |
To refresh the screen:
| 1. |
Click on Refresh [B] to clear the data entries on the
screen.
|
Special Remarks
Back to Forms
| CASE FILE / STAMP DUTY CERTIFICATE REFERENCE |
This section allows you to enter your case file reference, CPF case file reference and Stamp Duty Certificate reference.
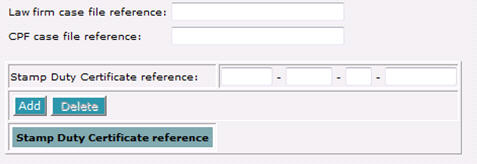
| 1. |
Enter the Law firm case file reference [T] if necessary. |
| 2. |
Enter the CPF case file reference [T] if necessary. |
| 2. |
Enter the Stamp Duty Certificate reference[T] if necessary. |
Stamp Duty Certificate reference
To create a record:
| 1. |

Proceed to enter the Stamp Duty Certificate reference No.[T] |
| 2. |
Click on Add [B]. Repeat the previous step to add more records. |
To delete a record:
| 1. |
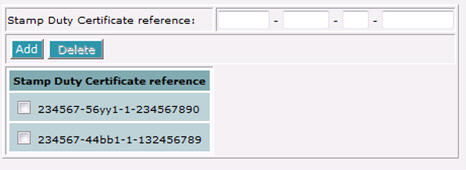
Select the check box(es) of the record(s) to be deleted.
|
| 2. |
Click on Delete [B]. |
Back to Forms


