Searching
for form templates
This function allows you to search for the form template you would like to use.
There are three ways to search for a form:
Search by Code
|
1.
|

Enter the Instrument Nature / Form Type code in the Search by Code [T].
|
|
2.
|
Click on Search [B].
|
|
3.
|

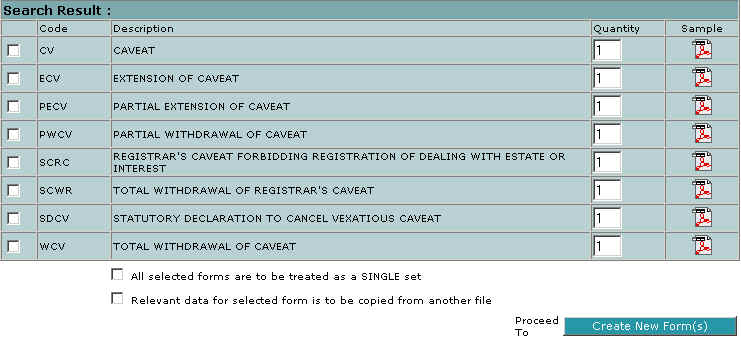
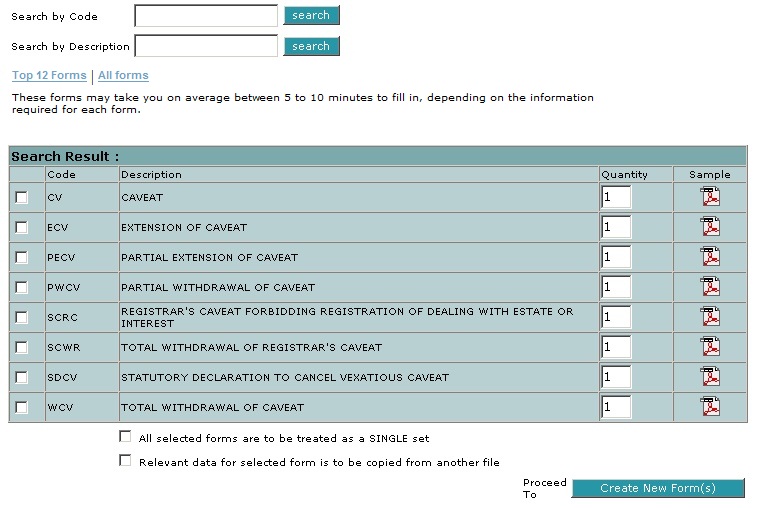
The results that meet the criteria will be displayed in a table. The example
above shows the result of searching by "CV". You may confirm the form you want
by selecting the checkbox and entering the number of forms you would like to
create in the Quantity [T] column.
|
|
4.
|
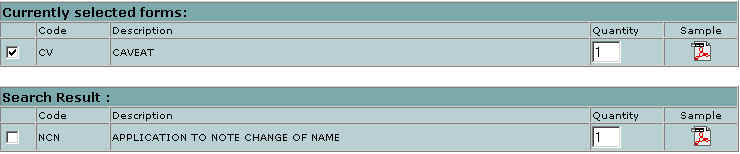
To search more than one Instrument Nature / Form Type code, please repeat the
previous steps and the new search results will be appended if you have selected
the instrument nature for the previous results. Otherwise, the new results will
replace the old results.
|
Search by Description
|
1.
|

Enter the keyword in the text box in Search by Description [T].
|
|
2.
|
Click on Search [B].
|
|
3.
|
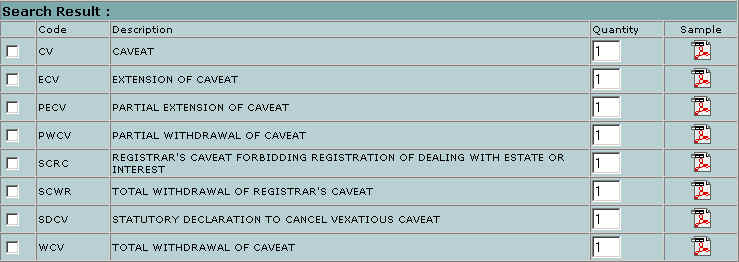
The results that meet the criteria will be displayed. The example above shows
the result of searching by "Caveat".
|
Search by selecting forms from the list of Top 12 forms
|
1.
|
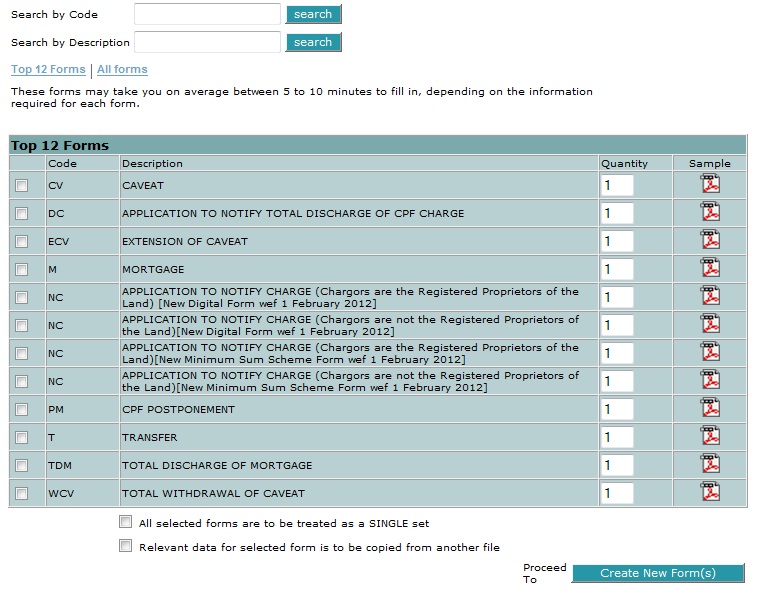
This is a list of the 12 forms. The forms are displayed in alphabetical order
according to Codes. You may confirm the form(s) you require by selecting the
check box(es) next to the form.
|
Search by selecting forms from the list of All forms
|
1.
|
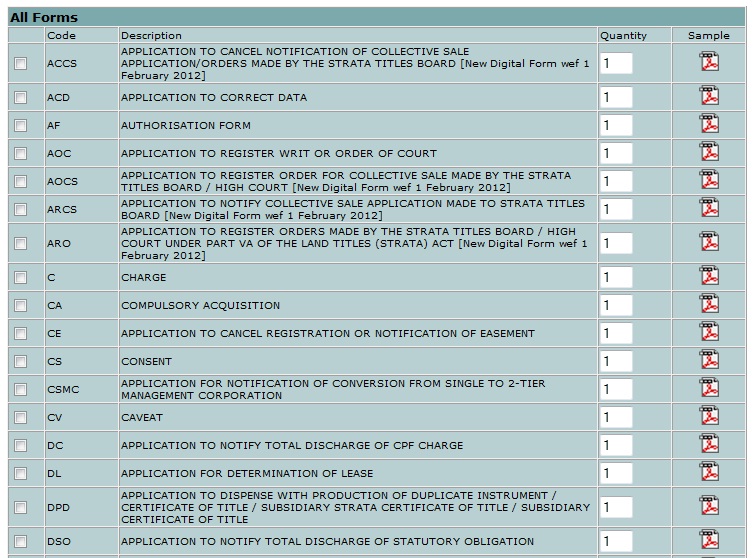
All forms will be listed in alphabetical order according to Codes. You may
confirm the form(s) you require by selecting the check box(es) next to the
form.
|
Back to
Menu
|
Preparing a new form
This function allows you to prepare a new form for lodgment. You will need to
use the Searching for form templates function.
|
1.
|

Click on Create New [M] from the top menu if you are not already on the
main menu.
|
|
2.
|
Use the Searching for form templates function
to search for the form you would like to prepare. The example above shows the
result of searching by "Caveat". Choose one or more form(s) by selecting the
check boxes.
|
|
3.
|
Click on Create New Form(s) [B].
|
Back to
Menu
Preparing a new form by copying from an existing instrument/form
This function allows you to prepare a new form for lodgment by copying from an
existing instrument/form. You will need to use the
Searching for form templates function.
|
1.
|
Click on Create New [M] from the top menu if you are not already on the
main menu.
|
|
2.
|
Use the Searching for form templates function
to search for the form you would like to prepare. The example above shows the
result of searching by "Caveat". Choose one form by selecting the check boxes.
|
|
3.
|
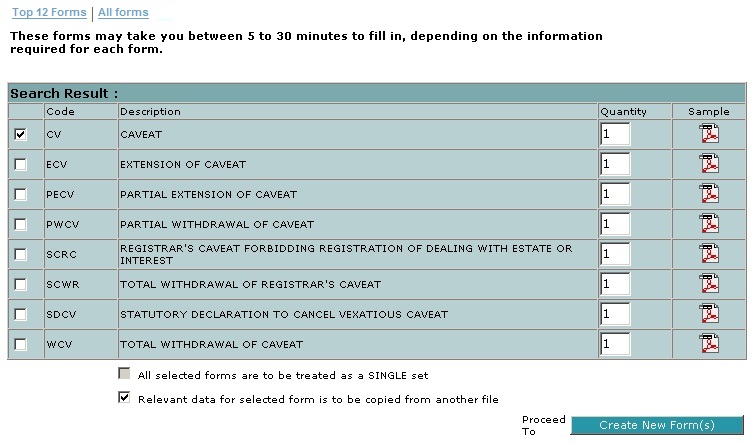
If you wish to copy information from an existing instrument/form,
select the checkbox next to Relevant data for selected form is to be copied from
another file as shown above.
|
|
4.
|
Click on Create New Form(s) [B].
|
|
5.
|
Refer to Copying
data from a previously prepared form function to select the file to
copy information from an existing instrument/form.
|
Back to
Menu
|
Navigating through the form sections

The forms are broken up into logical sections. The section where you are working
on is displayed in black, and without an underscore at the bottom of the
number.

As you place your mouse over the section numbers, the tool tip will display the
name of the section. The example above shows the tool tip for Section 1. To
navigate to a particular section, click on the respective section number. To go
to the next page, click on Next [B]. To go back to the previous page,
click on Prev [B].
Important Note:
Before you click on Prev [B] or Next [B], ensure that necessary
data are saved into the system first before proceeding.
For screens where there is an "Add" command button for multiple records,
make sure you click on Add [B] before you move to other sections or the
data will be lost.
For screens where there is no "Add" command button, data will be saved
when you click on Prev [B] or Next [B] or when you select another
section number.
Back to
Menu
|
|

Click on Reset Page [B] to clear the data entries on the screen. This
function is useful when you want to leave the section that contains incomplete
entries. This is commonly found in sections where there is only single entry.
Back to
Menu
|
Previewing currently prepared form
To view the formatted document you have prepared, click on Preview [B].
The document you have prepared will be displayed on the screen. You may also
print from the browser after using the Preview function. However, this is not
advisable as it may produce some alignment problems. Please use the
viewing and printing forms function instead.
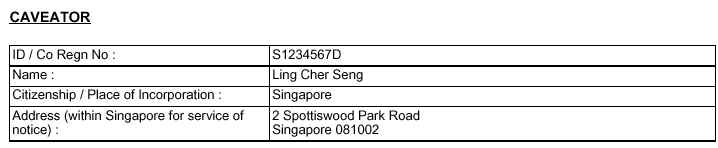
The above is an example of the printable format for the Caveator section.
Back to
Menu
|
|
This function allows you to save both completed and incomplete forms.
Save incomplete forms
Incomplete form is the form that is not filled in all required section.
Incomplete forms can be saved only.
|
1.
|
Click on Save As [B] or Save [B]. The Save command button
is only available in the
Amend function.
|
|
2.
|
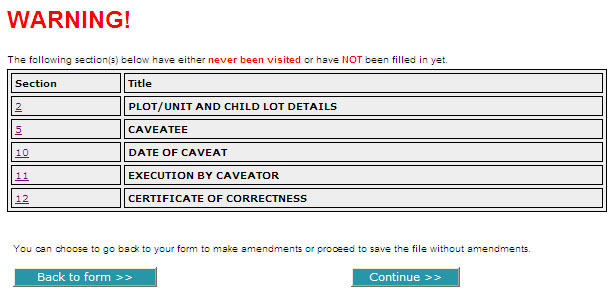
The System will display a warning for any sections that have not been visited
or have not been filled. Click on Back To Form [B] to return to the form
if you wish to enter data for the sections that you have not done. If you wish
to continue to save anyway, click on Continue [B].
If all the required sections have not been visited or not been filled or you
have click on Continue [B] in step 2, the system will proceed to display
the following screen.
|
|
3.
|
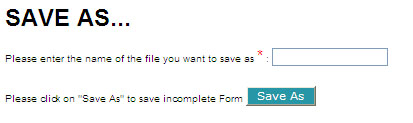
You will be asked to enter the filename [T] of the file to be saved. You
will not see this screen if you are amending an existing form as the previous
filename will be used.
|
|
4.
|
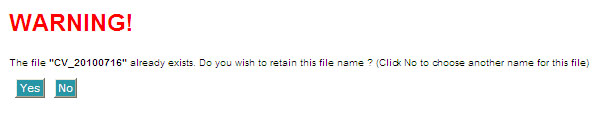
If the file already exists, a warning will be displayed. Click on Yes [B]
to retain the this file name. Click on No [B] to bring you back
to the previous screen.
|
|
5.
|
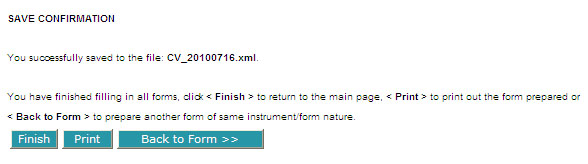
When a file is successfully saved, the above screen will be displayed. Click on Finish
[B] to return to the main page, Print [B] to view the
form, then you can print this form by yourself or Back to Form [B] to
prepare another form of the same instrument nature.
|
Save complete forms
Complete form is the form that is filled in all required section. Only complete
forms can be submitted for lodgment.
|
1.
|
Click on Save & Validate [B] or Save [B]. The Save command
button is only available in the
Amend function.
|
|
2.
|
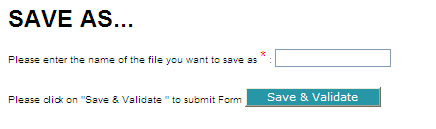
You will be asked to enter the filename [T] of the file to be saved and
validated. You will not see this screen if you are amending an existing form as
the previous filename will be used.
|
|
3.
|

If the file already exists, a warning will be displayed. Click on Yes [B]
to retain this file name and generate a new Instrument Number. Click on No
[B] to bring you back to the previous screen.
|
|
4.
|
When a file is successfully saved, the above screen will be displayed. Click on Finish
[B] to return to the main page, Print [B] to view the
form, then you can print this form by yourself or Back to Form [B] to
prepare another form of the same instrument nature.
|
Back to
Menu
|
Preparing a set of forms.
This function allows you to prepare a set of forms to be submitted together. You
will need to use the Searching for form
templates function.
|
1.
|
Click on Create New [M] from the top menu if you are not already on the
main menu.
|
|
2.
|
Use the Searching for form templates function
to search for the form(s) you would like to prepare. The example above shows
the result of searching by "Caveat". Choose one or more form(s) by selecting
the check boxes.
|
|
3.
|
If you need to copy the relevant contents, select the check box next to All
selected forms are to be treated as a SINGLE set.
|
|
4.
|
Click on Create New Form(s) [B] at lower right corner of the
screen.
|
|
5.
|
The below screen will be displayed. Follow the steps in Setting
order of form preparation.
|
Back to
Menu
|
Setting order of form preparation
This function is invoked when the check box next to "All selected forms are to be
treated as a SINGLE set" is selected. The purpose for this function is
to set the order of the form that you want to fill.
|
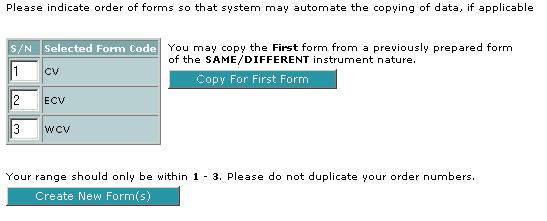
1.
|
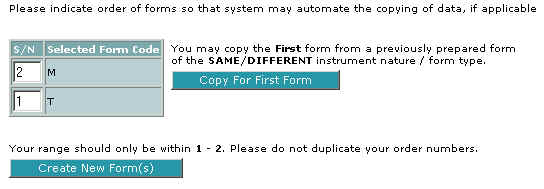
Enter the number in the S/N column in the order that the forms would be
created. For example, if you have a Transfer (T) form and a Mortgage (M) form
to fill, you will need to put the Transfer (T) form before the Mortgage (M)
form and not the other way around.
|
|
2.
|
Click on Create New Form(s) [B] if you want to create a fresh form
or click on Copy For First Form [B] if you want to copy the contents of
a previously prepared form to the first form of your new form.
When you have completed a form, save the form as usual and
the next form will be invoked for you to fill. Relevant contents from the
previous form will be copied to the next form. For example, assuming you have
three forms to fill, when you save the first form, the second form will be
invoked for you to fill. Relevant contents from the first form will be copied
to the second form. When you save the second form, the third form will be
invoked. Relevant contents from the second form will be copied to the third
form, if any.
|
Back to
Menu
|
Copying data from a previously prepared form
This function allows you to copy data from a previously prepared form. There
are two ways to copy a form:
|
1.
|
Click on Copy [M] from the top menu.
|
|
2.
|
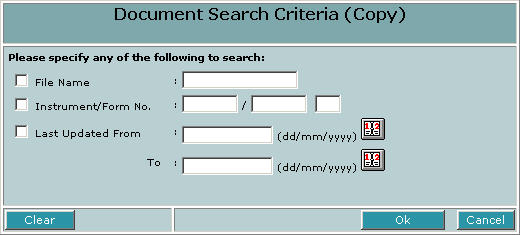
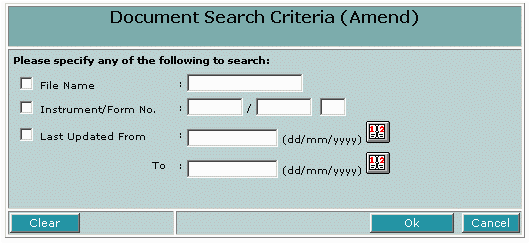
Select the check boxes next to the search criteria you want to use for
searching.
|
|
3.
|
Enter the text boxes next to the search criteria selected. Alternatively, the check box will be
automatically selected when data is entered into the text boxes.
You may enter the File name partially (e.g. test) and the system will
be able to search all the file names that contain the partial key word. Select the
relevant form you want to copy from.
|
|
4.
|
Click on Ok [B] to proceed or Clear [B] to clear all the entries
or Cancel [B] to return to the main screen.
|
|
5.
|

If Ok [B] is selected in the preceding steps, the above screen will be
displayed. Select the form to copy from by clicking on the radio button.
|
|
6.
|
Click on View [B] to view the form, Copy [B] to proceed with the
copy function and Cancel [B] to return to the previous screen.
|
|
7.
|
If the previously prepared form was prepared with an older version of STARS eLodgment, message or error(s) may be displayed accordingly.
|
|
8.
|
Click on Copy [B] to proceed to copy or View [B] to view form.
When the form to copy from is a caveat and the form to be copied to is also a caveat,
the below screen will be displayed when Copy [B] is selected. Select one of the options to copy from the existing caveat.
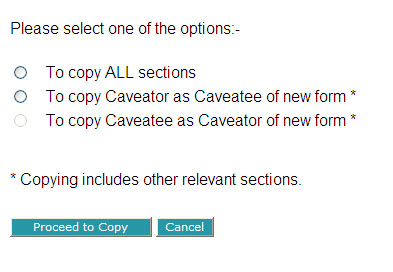
|
|
9.
|
Click on Proceed to Copy to copy from the existing Caveat based on the selected option.
Click on Cancel [B] to return to the previous screen.
|
| 1. |
Click on Create New [M] from the top menu if you are not already on the
main menu.
|
| 2. |
Use the Search by Description
function to search for the form you would like to prepare.
The example above shows the result of searching by "Caveat". Choose one form by
selecting the check boxes.
|
| 3. |

If you need to copy the relevant contents from an existing file of the
same/different nature, select the check boxes next to the search
criteria you want to use for searching.
|
|
|
|
|
4.
|
Enter the text boxes next to the search criteria selected. Alternatively,
the check box will be automatically selected when data is entered into the text boxes.
You may enter the File name partially (e.g. test) and the system will
be able to search all the file names that contain the partial key word. Select the
relevant form you need.
|
|
5.
|
Click on Ok [B] to proceed or Clear [B] to clear all the entries
or Cancel [B] to return to the main screen.
|
|
6.
|
If Ok [B] is selected in the preceding steps, the above screen will be
displayed. Select the form to copy from by clicking on the radio button.
|
|
7.
|
Click on View [B] to view the form, Copy [B] to proceed with the
copy function and Cancel [B] to return to the previous screen.
|
|
8.
|
If the previously prepared form was prepared with an older version of STARS eLodgment, message or error(s) may be displayed accordingly.
|
|
9.
|
Click on Copy [B] to proceed to copy or View [B] to view form.
Note:
- When the form to copy from is of the same Instrument Nature as the form to be copied to,
all the sections from the existing form will be copied to the new form.
- When the form to copy from is of a different Instrument nature to be copied to,
only relevant sections such as the Description of Land, Plot/Unit and Child Lot Details, Registered Proprietor (where applicable),
will be copied to the new form.
|
Back to Top
|
Amending a previously prepared form
This function allows you to retrieve and amend a previously prepared form.
|
1.
|
Click on Amend [M] from the top menu.
|
|
2.
|
Click on the check boxes next to the search criteria you want to use for
searching.
|
|
3.
|
Enter the text boxes next to the search criteria selected. The check box will be
automatically selected when the search criteria is entered into the text boxes.
|
|
4.
|
Click on Ok [B] to proceed or Clear [B] to clear all the entries
or Cancel [B] to return to the main screen.
|
|
5.
|
You may choose to enter the date
or use the calendar.
|
|
6.
|
If Ok [B] is selected in step 4, the above screen will displayed. Select
the form to amend by clicking on the radio button.
|
|
7.
|
Click on View [B] to view the form, Amend [B] to
proceed with the amendments and Cancel [B] to return to the previous
screen.
|
|
Note:
|
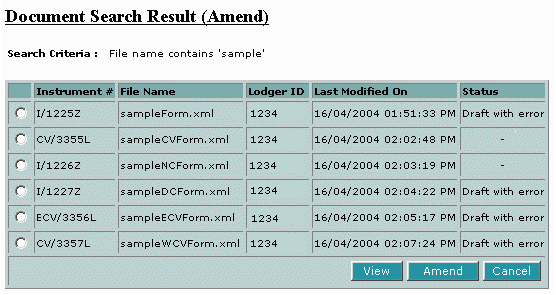
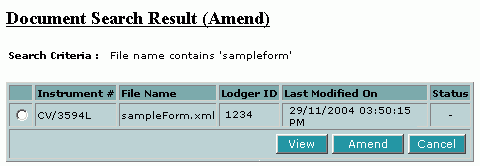
You may enter the File name partially (e.g. sample) and the system will
be able to search all file names that contain the partial key word. Select the
relevant form you need (e.g. sampleform).
|
|
8.
|
If
the previously prepared form was prepared with
an older version of STARS eLodgment, message or
error(s) may be displayed accordingly.
|
Back to
Menu
|
Deleting previously prepared forms
This function allows you to delete previously prepared forms that are no longer
needed.
|
1.
|
Click on Delete [M] from the top menu.
|
|
2.
|
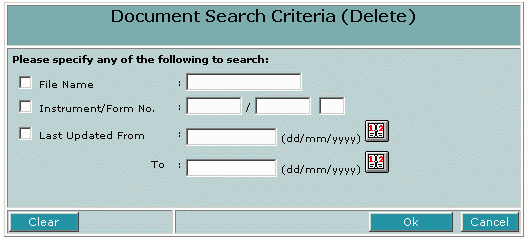
Click on the check boxes next to the search criteria you want to use for
searching.
|
|
3.
|
Enter the text boxes next to the search criteria selected. The check box will be
automatically selected when the search criteria is entered into the text boxes.
|
|
4.
|
Click on Ok [B] to proceed or Clear [B] to clear all the entries
or Cancel [B] to return to the main screen.
|
|
5.
|
You may choose to enter the date
or use the calendar.
|
|
6.
|
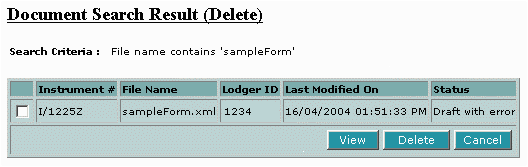
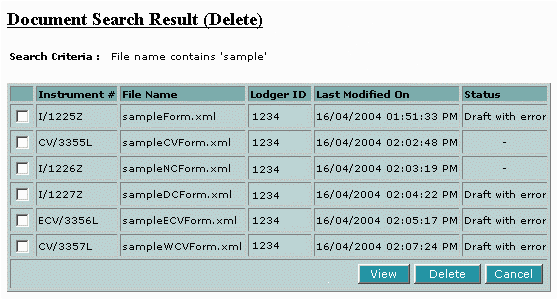
If Ok [B] is selected in step 4, the above screen will be displayed.
Select the form to delete by selecting the check boxes. You may also select the
directory to delete by selecting the check boxes next to the directory name.
All the forms under that selected directory will be deleted.
|
|
7.
|
Click on View [B] to view the form, Delete [B] to
proceed with the deletion and Cancel [B] to return to the previous
screen. You may only view one form at a time.
|
|
8.
|
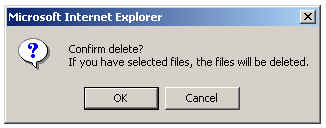
If Delete [B] is selected, you will be prompted to confirm your
deletion. Click OK [B] to proceed with deletion and Cancel [B]
to return to the screen.
|
|
Note:
|
You may enter the File name partially (e.g. sample) and the system will
be able to search all file names that contain the partial key word. Select the
relevant form you need (e.g. sampleform).
|
Back to
Menu
|
Viewing and printing forms
To view and print the forms that you have prepared previously:
|
1.
|
Click on View [M] from the top menu.
|
|
2.
|
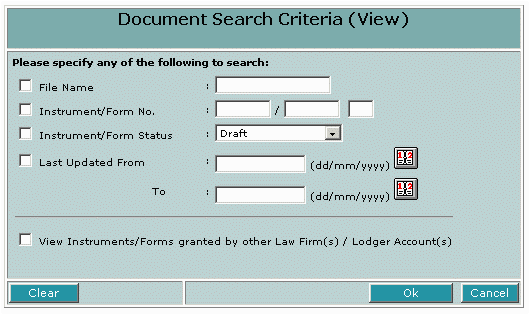
Click on the check boxes next to the search criteria you want to use for
searching.
|
|
3.
|
Enter the text boxes next to the search criteria selected. The check box will be
automatically selected when the search criteria is entered into the text boxes.
You may enter the File name partially (e.g. sample) and the system will
be able to search all file names that contain the partial key word. Select the
relevant form you need (e.g. sampleform).
|
|
4.
|
Click on Ok [B] to proceed or Clear [B] to clear all the entries
or Cancel [B] to return to the main screen.
|
|
5.
|
You may choose to enter the date
or use the calendar.
|
|
6.
|
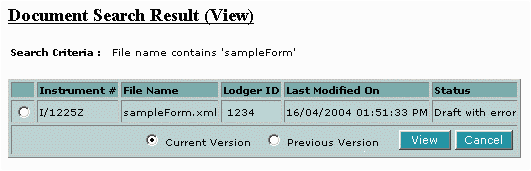
If Ok [B] is selected in step 4, the above screen will be displayed.
Select the form to view by clicking on the radio button.
|
|
7.
|
Click on View [B] to proceed to view the form or print
the form respectively. Click on Cancel [B] to return to the previous
screen. You may only view one form at a time.
|
|
8.
|
If
the form is prepared using an older version of
STARS eLodgment, appropriate message will be
displayed and viewing may not be allowed to
proceed.
|
Back to
Menu
|
View
To view instruments/forms that is for signing.
|
1.
|
Click on View [M] from the top menu.
|
|
2.
|
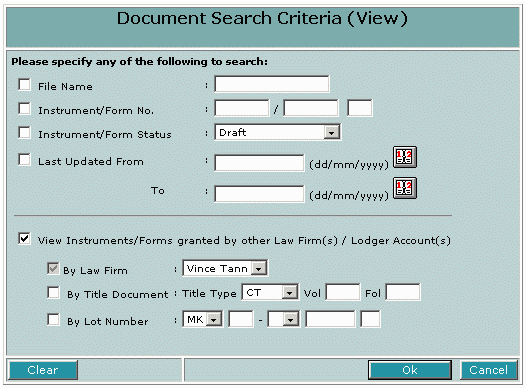
Click on the check boxes next to the label "View Instruments/Forms granted by
other Law Firm(s) / Lodger Account(s)".
|
| 3. |
If you want to narrow down the search result, you
may enter Title Document and/or Lot Number to make the search more specific. |
|
4.
|
Click on Ok [B] to proceed or Clear [B] to clear all the entries
or Cancel [B] to return to the main screen.
|
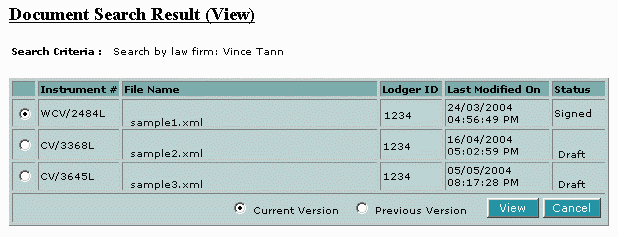
| 5. |
If Ok [B] is selected in step 4, the above screen will be displayed.
Select the form to view by clicking on the radio button.
|
|
6.
|
Click on View [B] to proceed to view the form or print
the form respectively. Click on Cancel [B] to return to the previous
screen. You may only view one form at a time.
|
|
7.
|
If signing/signed instrument/form is selected and View [B] in step 6 is
clicked, the following screen will be displayed.
|
|
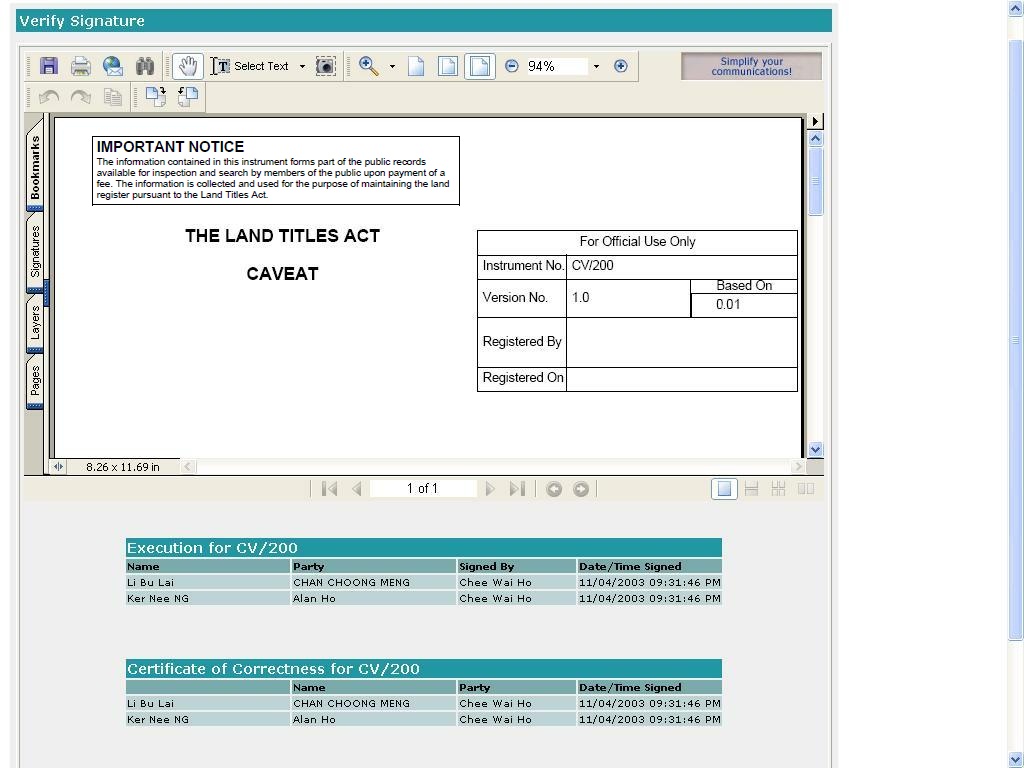
8.
|
If
the form is prepared using an older version of
STARS eLodgment, appropriate message will be
displayed and viewing may not be allowed to
proceed.
|
Back to
Menu
|